![OSI SOLUTIONS FINAL JPEG-01[3].jpg](https://static.wixstatic.com/media/93bf49_ff276ec9c565489187349dc0b3af8ef9~mv2.jpg/v1/fill/w_150,h_182,al_c,q_80,usm_0.66_1.00_0.01,enc_avif,quality_auto/OSI%20SOLUTIONS%20FINAL%20JPEG-01%5B3%5D.jpg)


Storage Spaces Feature -how to configure a Redundant Storage Space
- Hamizi Jamaluddin
- Jul 25, 2019
- 5 min read

Updated: Aug 2, 2019
What is Storage Spaces?
Storage Spaces is a storage virtualization capability that is built into Windows Server 2012 and Windows 8.
It is a feature that is available for both NTFS and ReFS volumes, providing redundancy and pooled storage for numerous internal and external drives of differing sizes and interfaces.
You can use Storage Spaces to add physical disks of any type and size to a storage pool, and then create highly available virtual disks from the storage pool.
The primary advantage of Storage Spaces is that you do not manage single disks, but can manage multiple disks as one unit.
To create a virtual disk, you need the following:
1 - One @ more physical disks
2 - Storage Pool that includes the disks
3 - Virtual Drives that are created with disk from the storage pool
4 - Disk drives that are based on virtual drives
That just a bit of explanation.. but now, let see how it work and how actually you can configure a Redundant Storage Space.
For this Demo, I'm using my DHCPSVR.cpx.local server (this server is member server to cpx.local domain) that I use to deploy DHCP Server in my previous post.
So lets get started.. be patient.. this going to be a long step by step..
1 - Verify your server to be use for Storage Pool.


2 - Open Server Manager, Click File and Storage Services, Click Disk, you can see in my server image I have 7 SCSI Disk with 32GB capacity each. I will use 5 SCSI Disk create Storage Pool.


3 - Next, lets create the Storage Pool by click Tasks and click New Storage Pool...


4 - After you click New Storage Pool... Before you begin wizard will popup, click Next to proceed..


5 - On the Specify a storage pool name and subsystem box, Enter the name of your new Storage Pool.. for this demo I use CPX-StoragePool1, and click Next to proceed..


6 - on the Select physical disks for the storage pool box, choose PhysicalDisk3 - PhysicalDisk7 (5 disks total), and click Next to proceed..

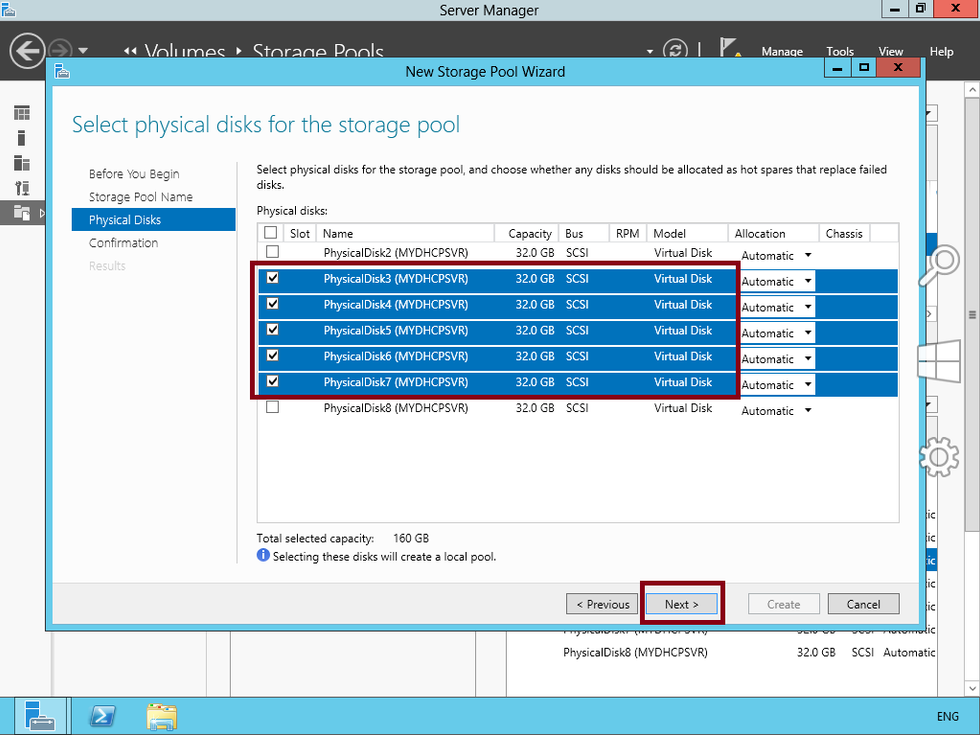
7 - On the Confirm selections page, click Create to proceed with the process.. here you can see Total of the storage pool is 160GB (32GB x 5)..


8 - On the View results box, wait until the task completes, then click Close.. process will take few second..


9 - Here you will see your newly Storage Pool successfully created and consist of 5 disks..


9 - Once the CPX-StoragePool1 successfully created, now its time for me to Create a three-way mirrored virtual disk (stores 3 copies of your data, if 2 simultaneous disk failures, you have another 1 running)
-- in the Storage Spaces pane, click CPX-StoragePool1, In the VIRTUAL DISKS pane, click TASKS, and then from the TASKS drop-down menu, click New Virtual Disk.


10 - click Next on the Before you begin box to proceed..


11 - Next, on the Select the storage pool box, click CPX-StoragePool1, and then click Next..


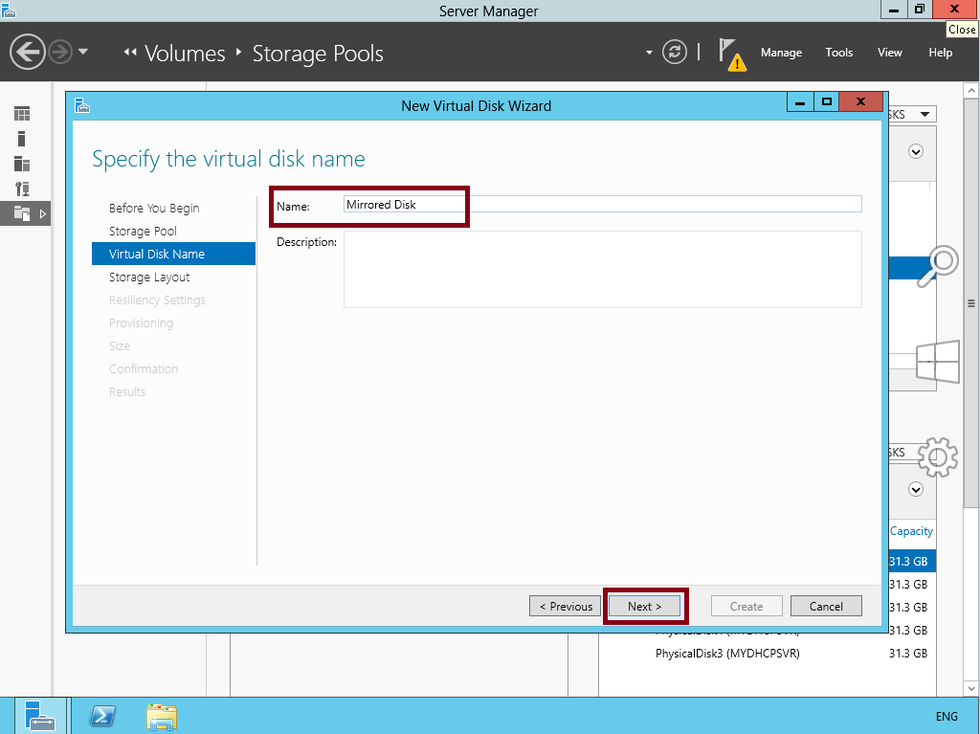
12 - Next on the Specify the virtual disk name page, in the Name box, type Mirrored Disk, and then click Next to proceed..

13 - On the Select the storage layout box, in the Layout list, click Mirror, and then click Next (Please read the Description before you proceed so that you understand why I choose Mirror)..


14 - On the Configure the resiliency settings box, click Three-way mirror, and then click Next to proceed..


15 - On the Specify the provisioning type box, click b, and then click Next.. (I choose this because my new volume later will uses space from storage pool when needed only)


16 - On the Specify the size of the virtual disk box, in the Virtual disk size box, type 10 (GB), and then click Next.


17 - On the Confirm selections box, click Create..


18 - On the View results page, wait until the task completes. Ensure that the Create a volume when this wizard closes check box is selected, and then click Close.


19 - In next wizard, just click Next to proceed..


20 - On the Select the server and disk box, in the Disk pane, click the Mirrored Disk virtual disk, and then click Next to proceed..


21 - On the Specify the size of the volume box, click Next to confirm the default selection..


22 - On the Assign to a drive letter or folder box, in the Drive letter choose any letter you prefer and for this demo I choose H as my drive letter, and then click Next..


23 - On the Select file system settings box, in the File system drop-down menu, click ReFS, in the Volume label box, type Mirrored Volume, and then click Next to proceed..
*** ReFS was introduced with Windows Server 2012 to enhance the capabilities of NTFS. ReFS was developed to improve upon NTFS by offering larger maximum sizes for individual files, directories, disk volumes, and other items. Additionally, ReFS offers greater resiliency, meaning better data verification, error correction, and scalability.


24 - On the Confirm selections box click Create to proceed..


25 - Next just click Close after all status completed..


26 - Open your Computer explorer to verify Mirrored Volume (H) is available and can be access..


27 - Next, lets copy a write.exe file just to simulate the whole process of this mirrored volume.. open command prompt and type Copy C:\windows\system32\write.exe H:\

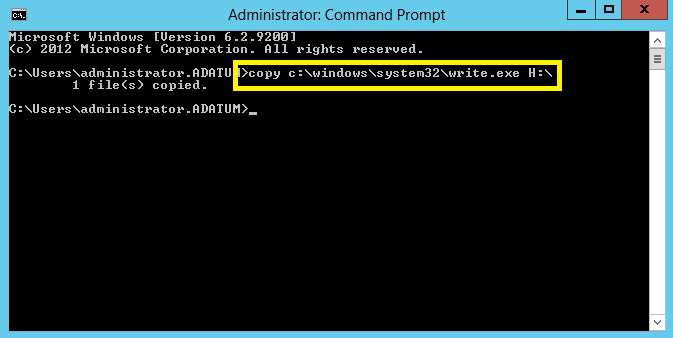
28 - Verify the file copied into H: Drive..


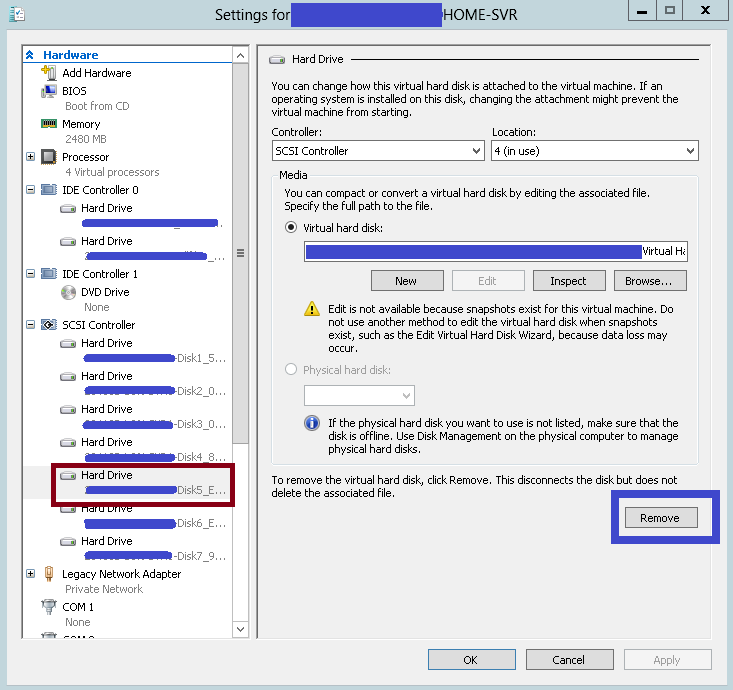
29 - Now, let simulate the whole process by remove 1 my Virtual Drive that attach to this Hyper-V image (in real scenarios, it should be your Physical Drive).. For this demo I will remove my DISK5.. in this simulation just assume that my DISK5 is failure.. On the Settings box, I choose my Disk5 and click Remove and then Apply..


30 - On the Setting box, just click continue to proceed with the disk removal process..


31 - Next, you can verify that the write.exe file is still accessible in the H: drive..
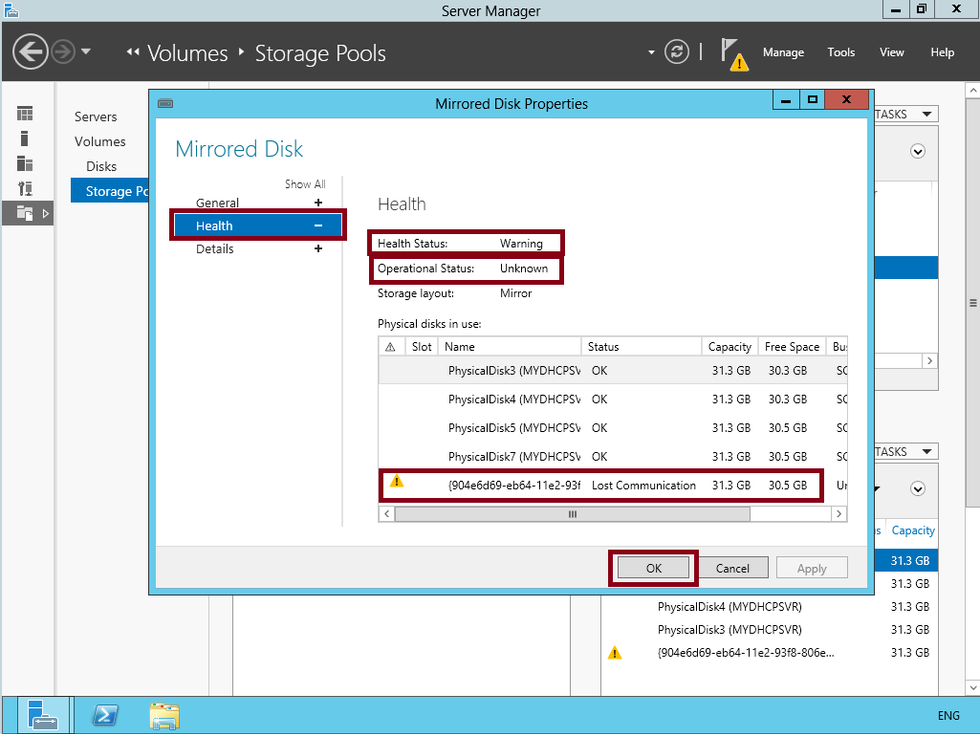
32 - Next, back to your STORAGE POOLS menu and click the Refresh.


33 - Before you continue, notice the warning that displays next to Mirrored Disk? In the VIRTUAL DISK pane, right-click Mirrored Disk, and then click Properties


34 - In the Mirrored Disk Properties dialog box, in the left pane, click Health. Notice that the Health Status indicates a Warning. Just click OK to close..

35 - Next, lets add a new disk (in my case is a Virtual Disk) to the storage pool and remove a broken disk..
-- In the STORAGE POOLS pane, right-click CPX-StoragePool1, and then click Add Physical Disk..


36 - Next, in the Add Physical Disk window, click PhysicalDisk8 (MYDHCPSVR), and then click OK..


37 - In the PHYSICAL DISKS pane, right-click the disk that has a warning that displays beside it, and then click Remove Disk..


38 - In the Remove Physical Disk box, click Yes to proceed..
39 - And lastly, Refresh “Storage Pools” to see the warnings disappear and you have your Mirrored Disk back on track with no down time @ what so ever..


Comments