![OSI SOLUTIONS FINAL JPEG-01[3].jpg](https://static.wixstatic.com/media/93bf49_ff276ec9c565489187349dc0b3af8ef9~mv2.jpg/v1/fill/w_150,h_182,al_c,q_80,usm_0.66_1.00_0.01,enc_avif,quality_auto/OSI%20SOLUTIONS%20FINAL%20JPEG-01%5B3%5D.jpg)


Simple Guide Deploying Server 2012 R2 Core using Windows Deployment Services (WDS)
- Hamizi Jamaluddin
- Aug 8, 2019
- 6 min read

Hi all,
Today lets go through a bit long process on how to deploy Windows Server using Windows Deployment Services (WDS).
1st, what's WDS?
Windows Deployment Services is a server role provided with Windows Server 2012 R2.
It provides the following functions:
• Enables you to perform network-based installations.
• Simplifies the deployment process.
• Supports deployment to computers that have no current operating system.
• Provides end-to-end deployment solutions for both client and server computers.
• Uses existing technologies, such as Windows Preinstallation Environment (Windows PE), Windows image (.wim) file and Virtual Hard Disk (.vhd) image files, and image-based deployment.
2nd, this is the scenario for my Demo, I had this my usual Small Infrastructure which is consists of DC01.comsys.local, Backup.comsys.local, Svr01.comsys.local, SVR-Core.comsys.local and my Surface01.comsys.local which is running Windows 8 Enterprise. So, what I going to do today is to deploy 1 more Server Core 2012 R2, instead of copy existing Server core 2012 R2.VHDX @ even install from scratch, why not we try something that we can actually implement in real environment, which is WDS.
For this demo also, I going to use my Backup.comsys.local server, this server is blank server but a member of domain server. I will install WDS in this Backup.comsys.local and from there I will deploy my new Server 2012 R2 Core.
There a hundreds of information you can dig out about WDS, but let me straight away show you all how actually we can deploy this in our actual environment.
So, lets get started...
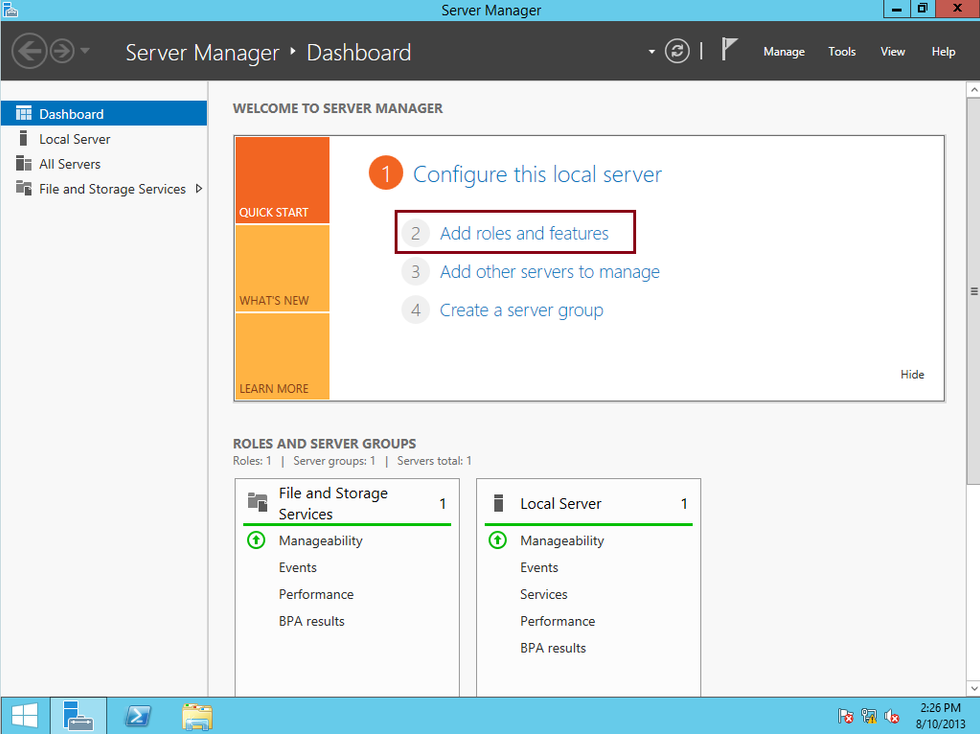
1 - We need to install WDS on the member Server, so on my Backup.comsys.local server, open Server Manager and then on the Dashboard click Add Roles and Features...

2 - Next, In the Add Roles and Features Wizard box, click Next...


3 - On the Select installation type page, verify that you choose Role-Based or feature-based installation then click Next...


4 - On the Select destination server page, verify that you choose backup.comsys.local server and then click Next...


5 - On the Select server roles page, select the Windows Deployment Services then click Next...


6 - On the Select features box, click Next...


7 - On the WDS box, review the information presented, and then proceed with Next...


8 - On the Select role services box, click Next...


9 - On the Confirm installation selections box, click Install...


10 - Once installation of WDS successful, just click Close...


11 - Next step, we need to configure Windows Deployment Services, open your Server Manager, click Tools, and then click Windows Deployment Services...


12 - on the Windows Deployment Services console, double click Servers, then right-click Backup.comsys.local, and then click Configure Server...


13 - On the Before You Begin box, click Next to proceed...


14 - On the Install Options page, verify that you choose Integrated with Active Directory and then click Next...


15 - On the Remote Installation Folder Location page, you can accept the default location which is C:\RemoteInstall and then click Next...


16 - on the System Volume Warning dialog box, click Yes...


17 - Next, on the PXE Server Initial Settings box, click Respond to all client computers (known and unknown), and then click Next, please wait for few second for the process to complete...


18 - Next, on the Operation Complete box, please clear the Add images to the server now check box, and then click Finish. (I will manually add the Server in the next step)...


19 - Before we proceed, please make sure that you already insert your Windows Server 2012 R2 installer, either DVD @ ISO format if you are using Hyper-V.


20 - Our next step is to add a boot image into WDS console, so in Windows Deployment Services console, double click Backup.comsys.local and then right-click Boot Images, and then click Add Boot Image...


21 - On the Add Image Wizard, on the Image File page, click Browse, then in Select Windows Image File box, double-click DVD Drive (D:), double-click sources folder, and then double-click boot.wim...


22 - On the Image File box, verify the File Location which is D:\sources\boot.wim and then click Next...


23 - On the Image Metadata box, click Next...


24 - On the Summary box, click Next...


25 - On the Task Progress page, click Finish...


26 - Once you successfully completed add a boot image into WDS, next you need to add an install image into WDS, so in the WDS console, right-click Install Images, and then click Add Image Group...


27 - In the Add Image Group box, type Win Svr 2012 R2, and then click OK...


28 - Next, on the WDS console, right-click Win Svr 2012 R2, and then click Add Install Image...


29 - In the Add Image Wizard box, browse to D:\sources\install.wim then click Next...


30 - On the Available Images box, select Windows Server 2012 SERVERSTANDARDCORE only, and then click Next to proceed...


31 - On the Summary box, click Next and wait for few minutes for the process to be completed...


32 - On the Task Progress box, click Finish...


So now we had completed to add the Install images to our WDS, next step is configure automatic naming for our new Server Core that we will deploy in short while.
33 - In WDS, right-click backup.comsys.local, and then click Properties...


34 - On the Backup properties, click the AD DS tab, In the Format text box, type ComSystemBranchCore-Svr-%02#, then under Computer Account Location, please browse to any OU that you want to point for the Server installation, for my demo I choose my Production OU since this Server Core is for Production use in the future, once you satisfy with the configuration, click OK to proceed...


Next, we need configure Administrator approval for this deployment to proceed, meaning is I only wants my Comsys administrator to deploy this server.
35 - Click the PXE Response tab, and then Select the Require administrator approval for unknown computers check box. On the PXE Response Delay, I choose 4 seconds, and then click OK...


36 - Next, open Windows PowerShell, and type this command : WDSUTIL /Set-Server /AutoAddPolicy /Message:“Comsystem Server Admin is authorizing this request. Please wait.”


37 - Next, please go to your Domain Server, which is DC01.comsys.local, and open Active Directory Users and Computers, then Right Click Production OU, and click Delegate Control...


38 - In the Delegation of Control Wizard, click Next...


39 - On the Users or Groups page, click Add, click Object Types, then select the Computers check box, and then click OK...


40 - In the Select Users, Computers, or Groups dialog box, in the Enter the object names to select box, type Backup, which is my WDS server, and then click OK...


41 - On the Users or Groups box, verify that we selected the Backup (Comsys\Backup) and click Next...


42 - Next, on the Tasks to Delegate box, click Create a custom task to delegate, and then click Next...


43 - On the Active Directory Object Type box, click Only the following objects in the folder, click Computer objects check box, select the Create selected objects in this folder check box, and then click Next...


44 - On the Permissions box, in the Permissions list, select the Full Control check box, and then click Next...


45 - On the Completing the Delegation of Control Wizard box, click Finish...


Next, return to our WDS server, what we will do now is to configure a WDS server for multicast transmission (Multicasting enables you to deploy an image to a large number of client computers without consuming excessive network bandwidth)...
46 - In WDS, right-click Multicast Transmissions, and then click Create Multicast Transmission...


47 - Next, on the Transmission Name box, in the Type a name for this transmission field, type ComSystem Branch Server Core 2012 R2, and then click Next...


48 - On the Image Selection page, in the Select the image group that contains the image list, click Windows Server 2012, then in the Name list, click Windows Server 2012 SERVERSTANDARDCORE, and then click Next...


49 - On the Multicast Type box, verify that Auto-Cast is selected, and then click Next then Click Finish...


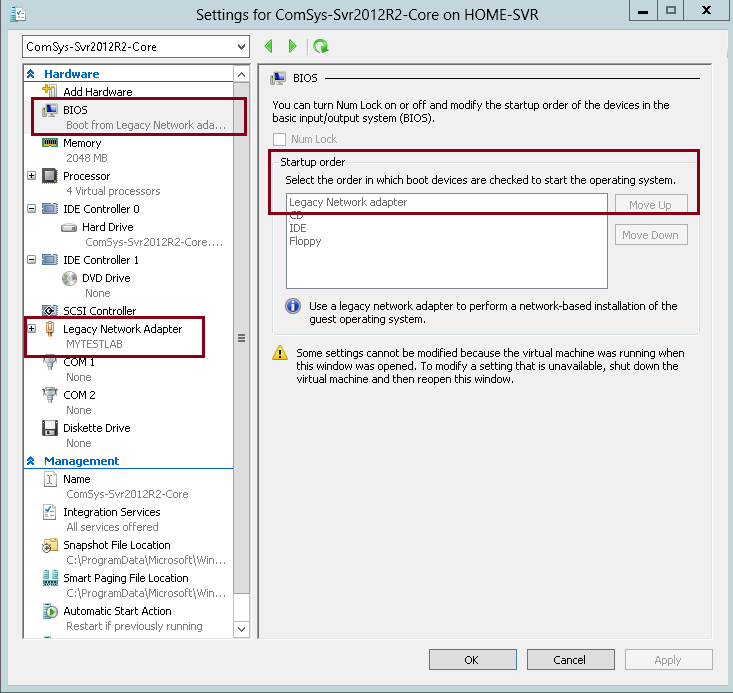
50 - Next, if you using VM as a demo, make sure that you configure the VM for Pre-Boot EXecution Environment (PXE) Booting in your Hyper-V, for example here is my own setting...

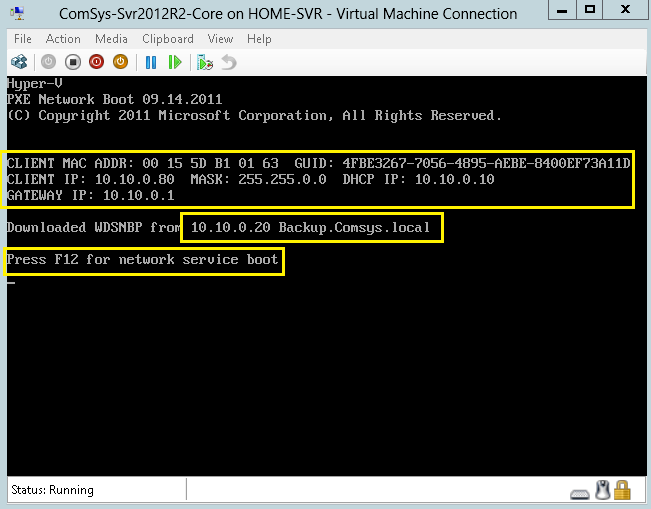
51 - Next, turn on the new Server that you want to install the Server Core using WDS, in my demo my server will be ComSys-Svr2012R2-Core, when the server turn on, review the Client MAC ADDR, Client IP and Gateway IP, When prompted, press F12 for Network Service Boot...

52 - now you should see the admin approval message....


53 - Now, return to WDS Server, In WDS, click Pending Devices, right-click the pending request, and then click Approve...


54 - In the Pending Device dialog box, click OK...


55 - Next, go to the ComSys-Svr2012R2-Core server and you should see now our ComSys-Svr2012R2-Core is loading files from the WDS server....


56 - If the loading files successful, WDS Windows Setup box will appear and you can proceed by clicking Next...


57 - Next, on the Select the operating system you want to install, you should notice that Windows Server 2012 Serverstandardcore is listed, then click Next to proceed with installation...


58 - while the ComSys-Svr2012R2-Core is installing the Windows, you can return to WDS server and click Multicast Transmissions, then click ComSystem Branch Server, on the right pane, you will see installation status is running....


59 - once the ComSys-Svr2012R2-Core installation completed, you can proceed with configuration...


Please refer to my previous post if you want to proceed with Server Core configuration : https://mizitechinfo.wordpress.com/2013/07/29/configure-network-in-server-2012-r2-core/


Comments